Tuesday, March 29, 2011

Scrap Exchange Warehouse Fabric Sale Loot

Fabric Sale Fabric: Adorable!

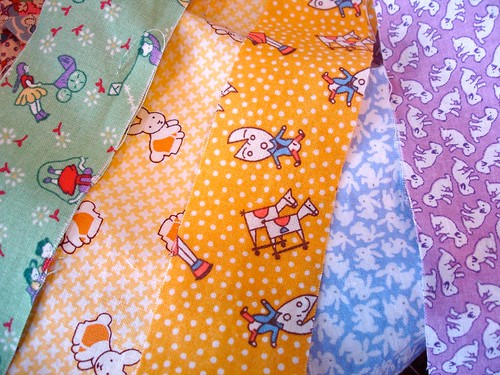
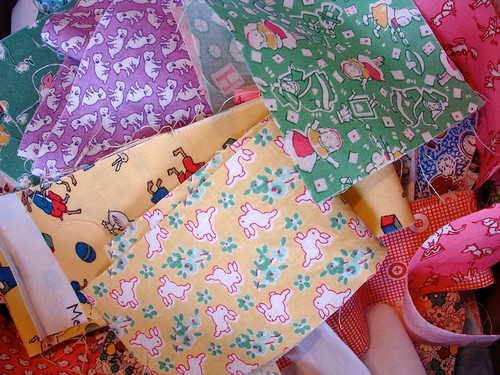
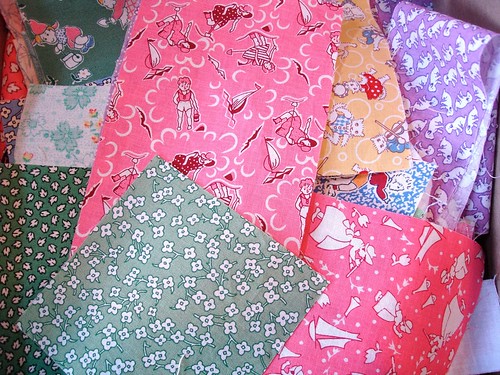
One of the $8 bags of quilting fabric that I got at the Scrap Exchange Warehouse Fabric Sale was more than half full with all these adorable fairy tale prints. They're all in different colors that sort of go together, and they're cut into strips, squares and triangles already, so I'm thinking that their other non-scrap pieces are already a quilt somewhere else. But they are so cute that I'm going to need to make a quilt out of them. Maybe several!

Of course, that will have to wait until I'm actually closer to finished with the other two quilts I'm working on, right?
I promise I will post a picture of something *other than* fabric or quilt blocks in the next couple of days, okay. Deal.
In the meantime, here's some more fabric!
Adorable Fabric Sale Fabric - Not Sure of the Brand/designer
Fabric Sale Fabric: Adorable!

My favorites of these fabrics are:
- The green Alice in Wonderland fabric (which I have in varied hues as well!)
- The scattered puppy and bunny fabrics, where they just look like adorable designs
- Lavender fabric with lily of the valley silhouettes in white (not pictured)
- The yellow with leaping rabbits

I have searched on google image search and etsy trying to find out what the designer/brand/anything for these fabrics are, but I can't discover it. If you have any idea let me know.
Edited: Some of the fabrics are Marcus Brothers, but I haven't found the collection names (I found a selvage with part of the name)

For now, I'm going to wash and iron it all and put it away until I can come back to it. Probably occasionally patting it and staring at it too :).

Monday, March 28, 2011

Livejournal Test

Attention! This could be working!

OMG More Quilting! Robot Quilt Beginnings

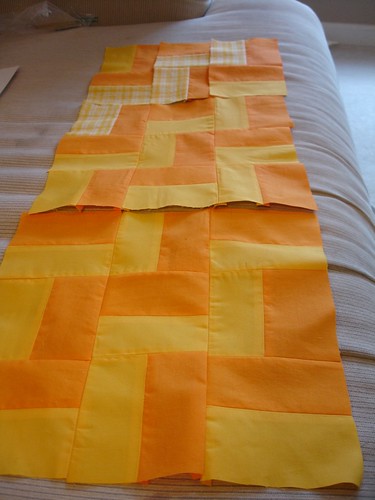
The Beginnings of a Robot Quilt
Beginnings of a Robot Quilt
Perhaps, since it's a robot quilt, it's supposed to be called Beta? Or maybe that's just my first version of it, not just the beginnings of the first row of blocks.

I showed Annie a copy of "Dare to Be Square Quilting" (by far my favorite quilting book thesedays) and asked her which quilt she would like for her new baby son Danger (nickname, don't worry). She picked the "Does Not Compute" quilt which is a seriously good choice. I think maybe she's trying to create a theme in her house of large orange and blue robot designs I've made (she also has this giant orange and blue robot painting of mine - just saying).

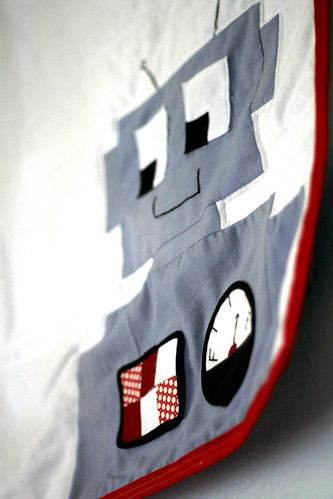
ANYWAY! I am working madly on these two quilts. Here's what the Does Not Compute quilt looks like when finished:
Robot Quilt

It's 523 cut fabric pieces sewn into 30 blocks and then, you know, made into a quilt. I'm 2.5 blocks in! I figure he'll get it by the time he's 2 at least, right?

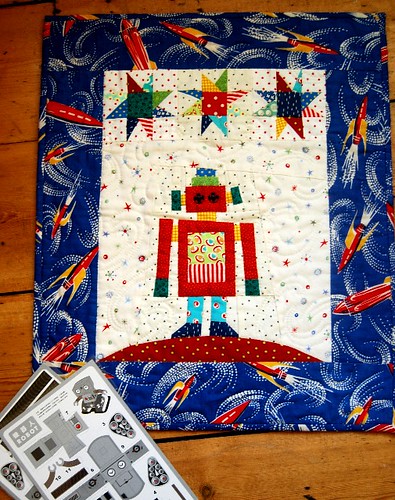
Oh! So in looking for an image of the Does Not Compute robot quilt on flickr I stumbled across a baby quilt sized one ChelseaWa designed and made!
Robot baby quilt top
I'm kind of jealous I didn't come up with this design idea myself! But I'm quite happy making something ridiculously big - it will make me feel super accomplished. And hopefully Danger will like it and it can go on his bed (since it's twin sized).

I found some other cute robot quilts while I was searching too!
Zak the Robot Quilt from bumblev
Zak the Robot Quilt

And this Robot Quilt by someone named Jan
robot quilt from Jan

I'm off to work on prepping quilt fabric, and designing bowties, and making stuff with zippers, and prepping tshirt material for stuffed animals and latch hook rugs and ... I'll see you tomorrow. :)

Thursday, March 24, 2011

Altered Four Square Quilt Block Tutorial, or How I Am Going to Learn to Make Tutorials

Altered Four Square Quilt Blocks - Laid Out
Maybe the internet doesn't need another quilting tutorial, and maybe, if I knew what the heck this actual quilt block was called, I'd just link you to someone else's. But! Since I feel like making tutorials is something every good crafty blog does, and I need practice doing them, you get at tutorial. Hooray! Right?

And, it's going to be incredibly long! Because it's picture time, picture time! I'm a visual person, and I love tutorials with 1,000,000 pictures so I know when they say "flip the second piece over and sew it" that I'm flipping the correct piece over, and then sewing it EXACTLY LIKE THEY ARE. I don't want to get to step 8 and be all "Oh crap, UR DOING IT WRONG" all over everything and cry and cry.

I don't actually cry. I just give up. Or, really, what I do, is look at the entire tutorial and if it doesn't make sense with the pictures and text, then I don't do it. Which has a lot to do with my whole perfectionism thing, and my worry that I'm just going to make a mess, which I'm getting over, thank you. I am all cool with making messes.

Enough about me, let's talk some more about sewing quilt blocks. That's what we're here for.

Materials:
- Rotary Cutter
- Clear Quilter's Ruler
- Cutting Mat
- 4 Fabric Squares of the same size (I'm using 4 inch x 4 inch squares here)
- Sewing Machine & Electricity
- Thread
- Iron
- Pins!

Step 0 (not shown): Prepwork
Wash your fabric. Iron it and cut it into 4 inch squares. I like to do the cutting just whenever - watching TV or while waiting for my tea to steep - with my 4 inch square Omnigrid cutting guide made of plexiglas and my rotary cutter. In case that's helpful. Also, set up your sewing machine - thread it and all that stuff.

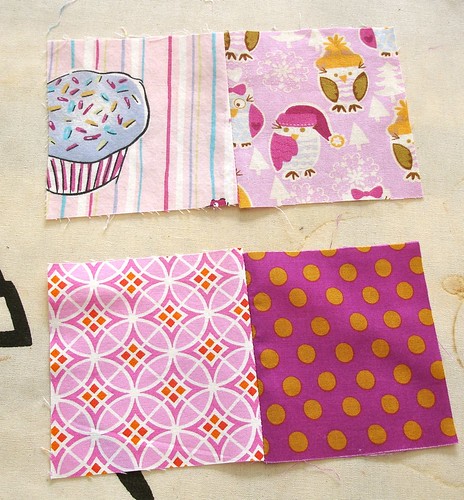
Step 1: Layout Four Squares the Way You Like
We're sort of making a picture frame (as you see in the picture above) so the top two squares I will call the Framing Pair, and the middle two squares I will call the Middle Pair. The top Framing Pair is centered in the design. The bottom "middle square" is centered with it's companion to the right. I actually decided to make the diamond design the "Middle Square" - so sorry for the confusion. I forgot to take a picture! Or I screwed up! Whichever! Just remember - AFTER this picture, diamonds are middle square and polka dots are companion square.
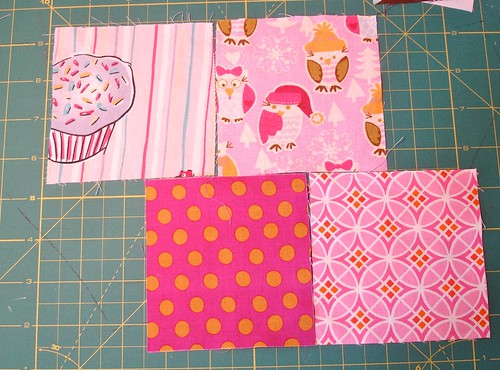
Altered Four Square Quilt Block Tutorial: Positioning of Both Pairs

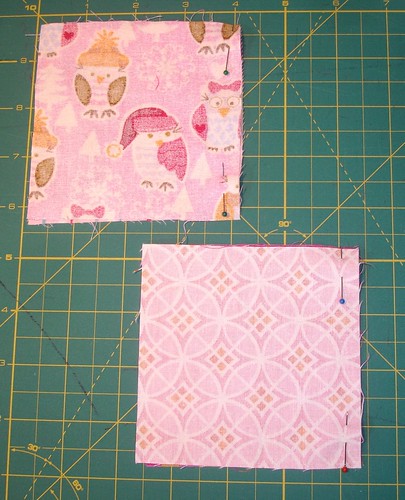
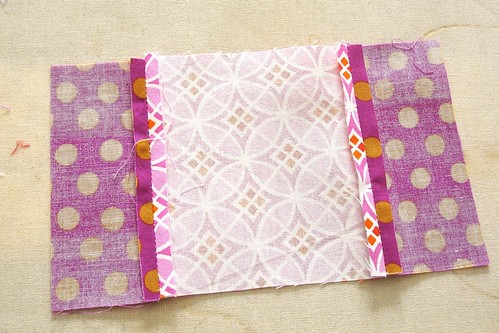
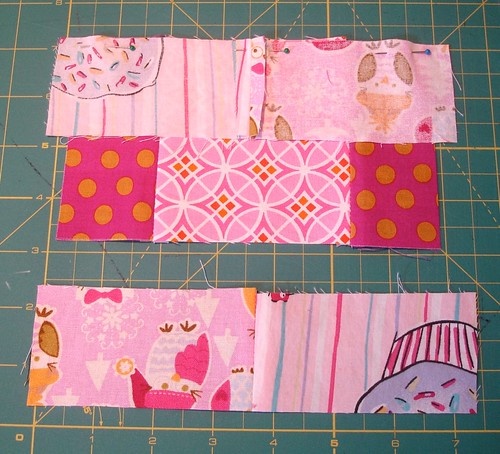
Step 2: Flip and Pin Both Pairs
Flip the right square of both pairs over onto the left square so that the right sides of the fabric are facing each other. Then pin on the right side (for optimum sewing machine feeding) of both.
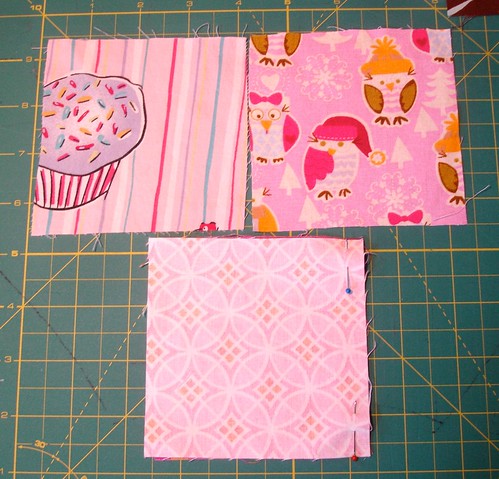
Altered Four Square Quilt Block Tutorial: Initial Pinning of Both Pairs

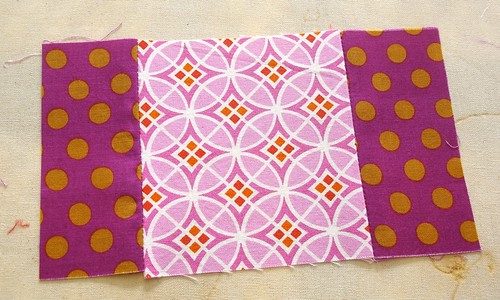
Step 3: Sew Pairs (No backstitching)
Sew each of the pairs using a straight stitch 1/4" from the right edge and don't backstitch at the beginning and end. I know, it's weird. Just sew straight through both of them. In fact, I like to feed them in one after the other (waiting a bit while running the machine between so they don't overlap). It makes a sort of cute garland! Cut them apart and trim the threads.
Note: This top picture actually has four pairs in it instead of two - I'm working on two blocks at once - the other pairs are for a white block. Don't get too confused by this, just pay attention to the pink ones!
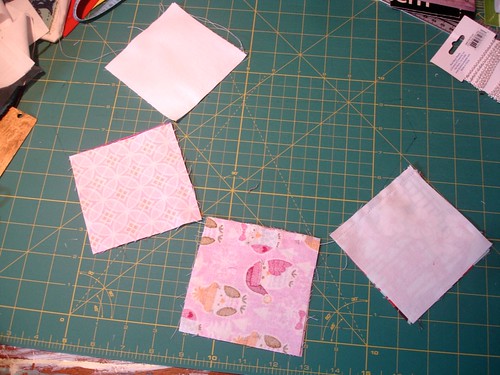
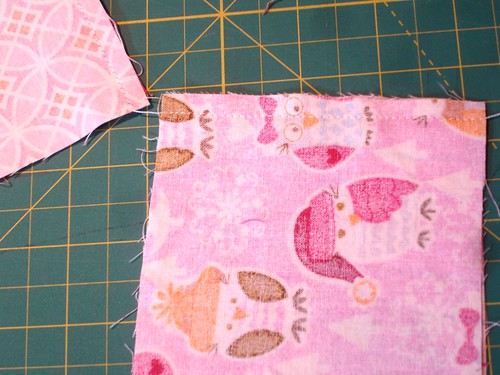
Altered Four Square Quilt Block Tutorial: Initial Sewing of Both Pairs
Altered Four Square Quilt Block Tutorial: Sewing Both Pairs

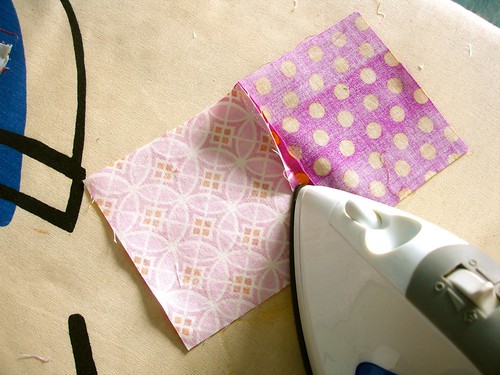
Step 4: Pressing
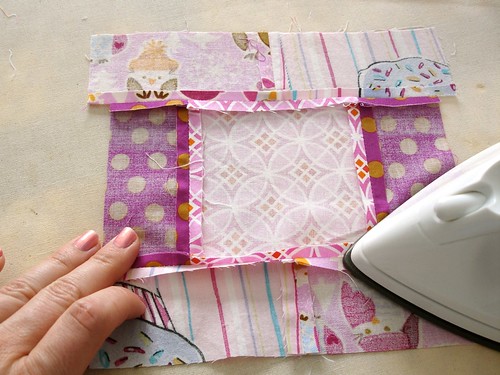
Set the sewn pairs on your ironing board, opening them up with the right sides down. Gently flatten down the seam allowances and press them open with your iron. Don't run the iron back and forth, move the iron by gently pressing it up and down on the fabrics. I like to think of it as gently *stomping* the fabric with the iron. Like a baby elephant. This is part of the "not having backstitched" thing, as moving the iron around may loosen your stitches and also stretch your fabric out weird. I am guilty of doing this all the time, though, so don't stress it too much, just try.
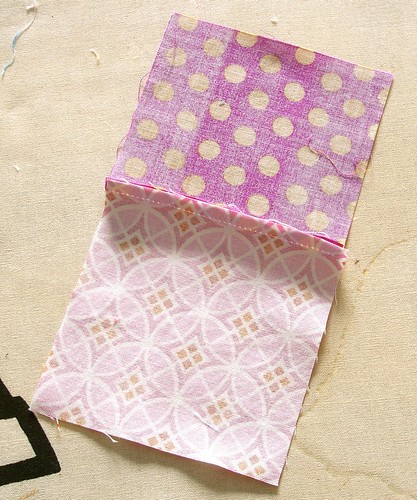
Altered Four Square Quilt Block Tutorial: Pressing Both Pairs

Flip the pairs over and press the front as well. Ahh, those look nice.

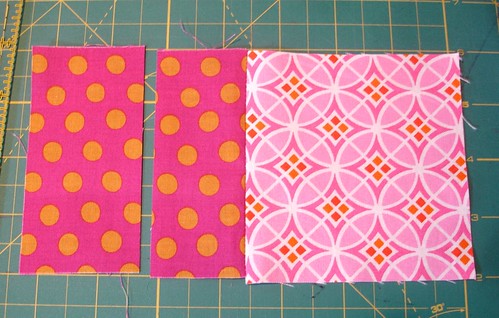
Step 5: Cutting the Middle Pair
Remember which square was your "middle square" in your Middle Pair? Good! Obviously I don't, because I am now using the diamond as the "middle square" and the polka dots as the companion. Oh well, we shall sally onward.

Now, take and cut the companion or non-middle square in half vertically. I use the clear plastic ruler here to measure two (2) inches from its edge (it's not going to look perfectly centered anymore, because you've sewn the other side) and cut with my rotary cutter so I end up with at 2"x4" piece.
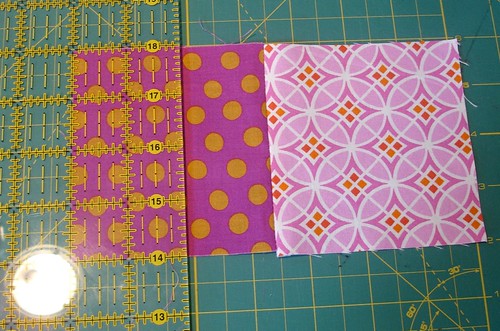
Altered Four Square Quilt Block Tutorial: Cutting the Middle Pair

Step 6: Flip and Pin the Middle Pair
Flip the 2" x 4" piece you just cut so that the right sides are facing each other (and the wrong sides are facing out) and line it up on the other side of the Middle Square. Pin along the right side.
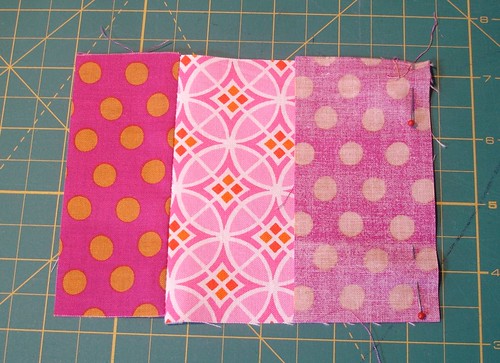
Altered Four Square Quilt Block Tutorial: Pinning the Middle Pair

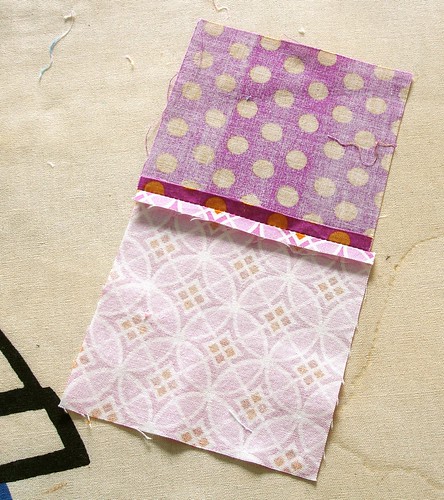
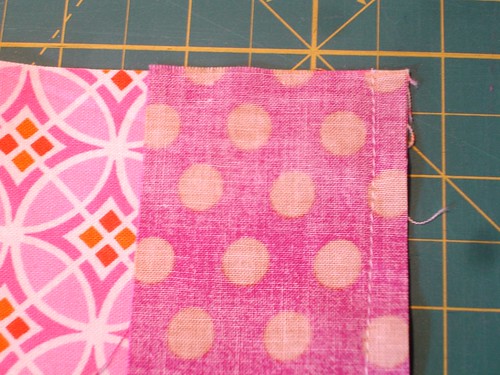
Step 7: Sew the Middle Pair
Sew together using a straight stitch 1/4" from the right edge and don't backstitch at the beginning and end.
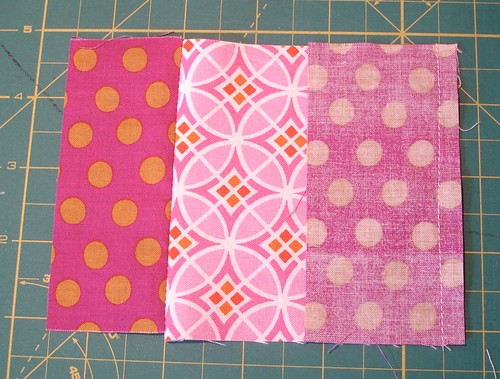
Altered Four Square Quilt Block Tutorial: Sewing the Middle Pair
Altered Four Square Quilt Block Tutorial: Sewing the Middle Pair - Closeup

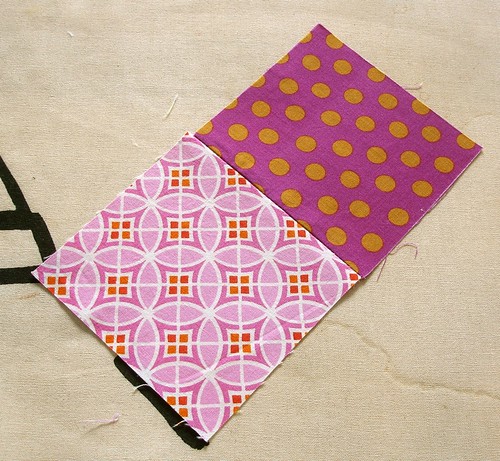
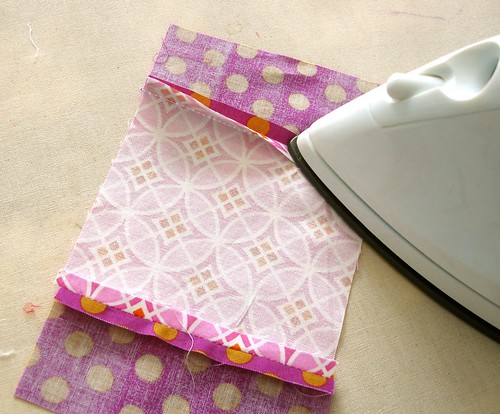
Step 8: Press the Middle Pair
Flip the fabric over and open so the right sides are all down, then gently press open the seams. Press the front as well.
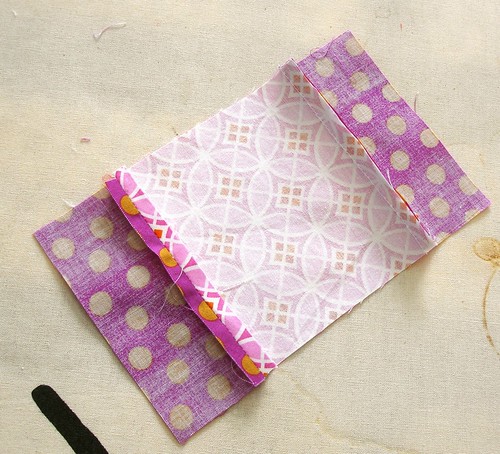
Altered Four Square Quilt Block Tutorial: Pressing the Sewn Middle Pair

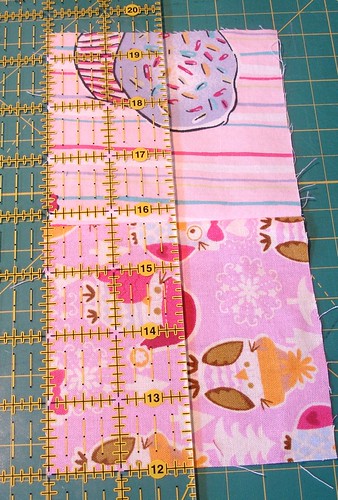
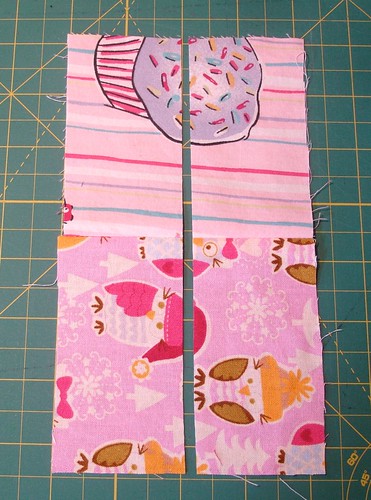
Step 9: Cutting the Framing Pair
Lay the Framing Pair above the now-completely-sewn Middle Pair and refresh your memory about how you want the block to go. Layout your Framing Pair so that it's vertical and cut it in half vertically 2" from both sides using the clear ruler. That didn't make the best sense, but essentially, you want to cut it into two long strips of 2" x 7.75" (or so).
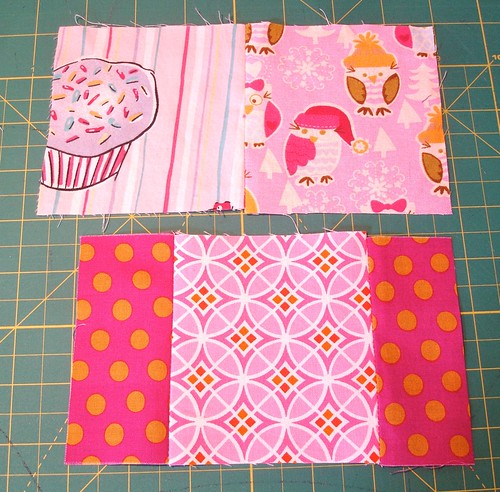
Altered Four Square Quilt Block Tutorial: Positioning the Framing Pair around the Sewn Middle pair
Altered Four Square Quilt Block Tutorial: Cutting the Framing Pair

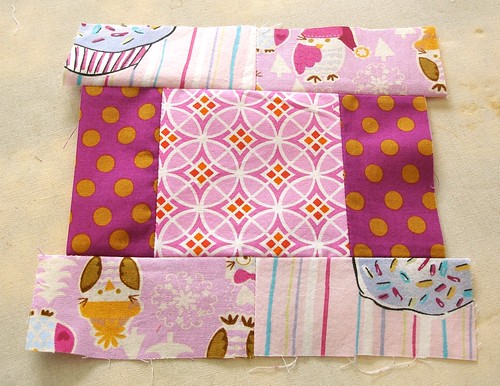
Step 10: Position and Pin Top of Framing Pair
Layout the cut Framing Pair around the now-completely-sewn Middle Pair. Try and center the Framing Pair seams. I like to alternate the sides of the patterns, so the Framing cupcake is on the left at the top, and on the right at the bottom, but you're welcome to do this however you like.
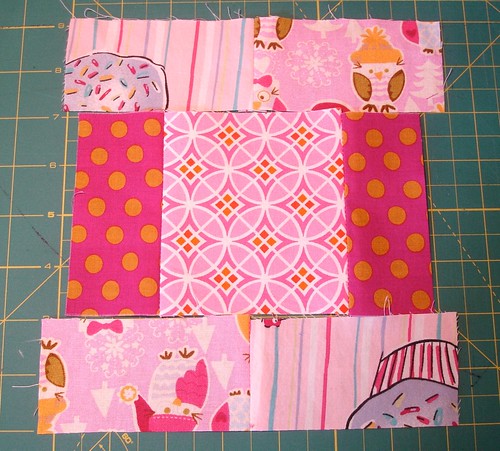
Altered Four Square Quilt Block Tutorial: Positioning the Framing Pair around the Sewn Middle pair
Altered Four Square Quilt Block Tutorial: Pinning the Top of the Framing Pair

Step 11: Sew Top of Framing Pair
Sew 1/4" from edge using a straight stitch. Do not backstitch.
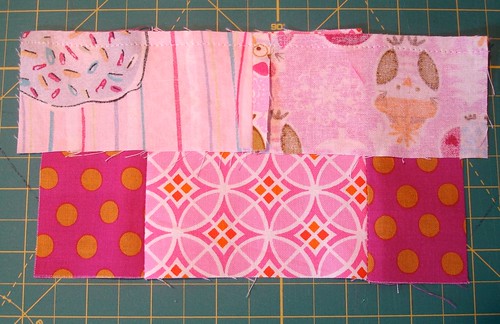
Altered Four Square Quilt Block Tutorial: Sewing the Top of the Framing Pair to the Block

Step 12: Position and Pin Bottom of Framing Pair
For once after sewing you don't immediately go and press! Nope! This time, bring the just sewn and still folded piece back over and line up the bottom of the framing pair so that the the right sides of the bottom framing pair are laid down on the right sides of the middle pair, and match up the seams from the top of the framing pair (part you've just sewn) and the bottom of the framing pair.
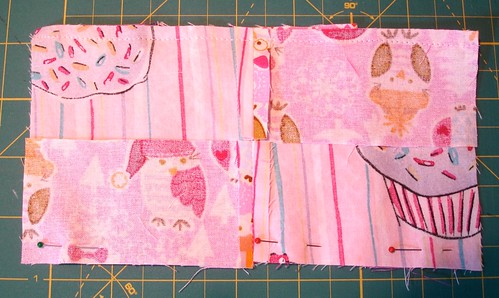
Altered Four Square Quilt Block Tutorial: Pinning the Bottom of the Framing Pair

Step 13: Sew Bottom of Framing Pair
Sew 1/4" from edge using a straight stitch, and (say it with me) do not backstitch.
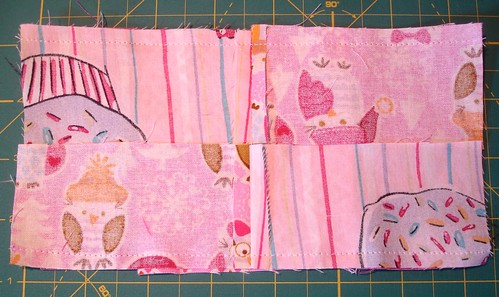
Altered Four Square Quilt Block Tutorial: Sewing the Framing Pair

Step 14: Press it One More Time!
Unfold and lay the block flat on the ironing board with all the right sides facing down. Gently press the seams open with the iron, pressing it up and down on the seams, not moving it all around. Then flip over and press from the front.
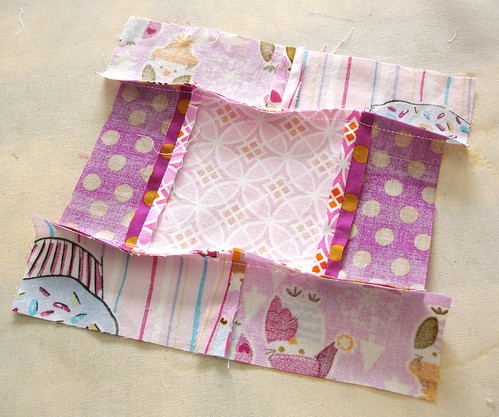
Altered Four Square Quilt Block Tutorial: Pressing the Block's Seams
Altered Four Square Quilt Block Tutorial: Pressing the Block

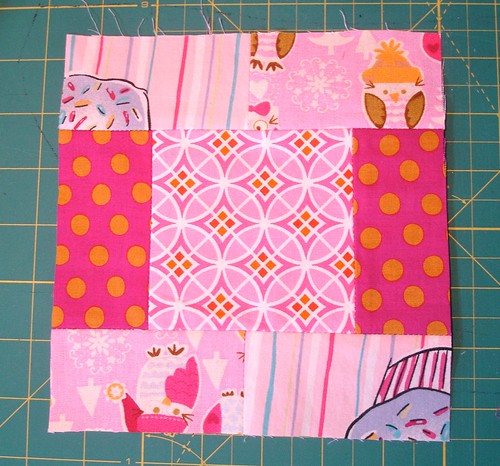
Step 15: Square Up/Trim Edges
Take the quilt block back to your cutting mat and trim it into a square shape using your clear plastic ruler and rotary cutter.
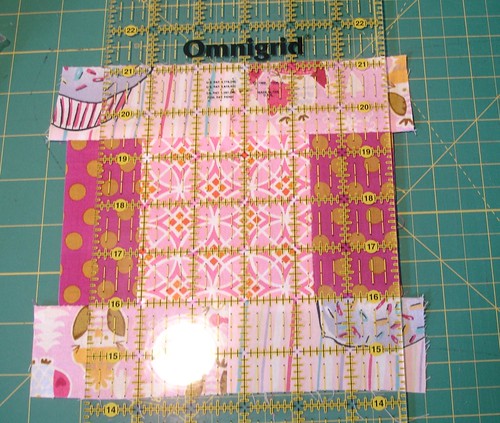
Altered Four Square Quilt Block Tutorial: Trimming the Block / Squaring Up

You Now Have a Square!
Altered Four Square Quilt Block Tutorial: Finished Bloc
Since I'm using four inch squares to begin with, the end block is a bit of an odd size - it's like 7.75" x 7.75" so I'm not entirely sure what size I'm going to do the final "squaring up" to. I'll be sure to post it when I'm through.

Tips!
- Be sure when cutting your fabric squares to cut with the fabric threads squaring up as well. Otherwise, cutting them when they're going diagonally, or on the bias, will make them all stretchy and weird.
- If you do maintenance and re-threading on your sewing machine, be sure to have extra fabric around to do some test runs on before using your "actual" fabric. That way you don't screw up one of your pieces.
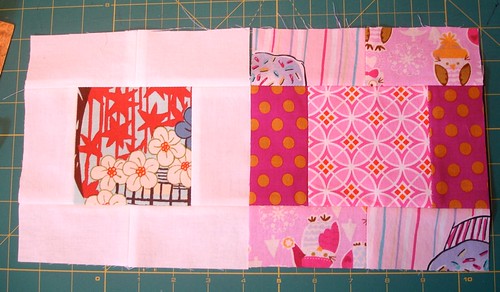
- I like to to work on two squares at a time, one with an all white frame and a patterned one. See
Altered Four Square Quilt Block Tutorial: Finished Blocks
I don't get confused, and it's easy to to double-up some of the work. Other people can probably do more.

I hope that helped somebody out there. It's a pretty easy block that doesn't require much of you, alternating the blocks with white framed blocks looks really pretty to me.
Tuesday, March 22, 2011

My Scrap Quilting Obsession

Guess what I've been doing?
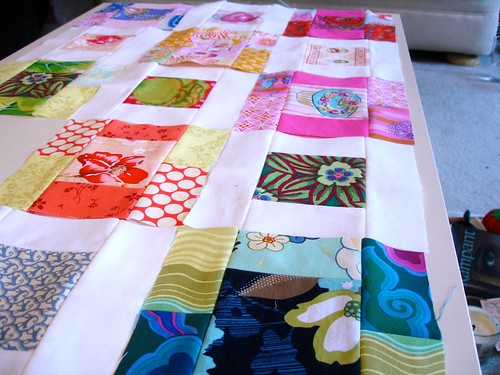
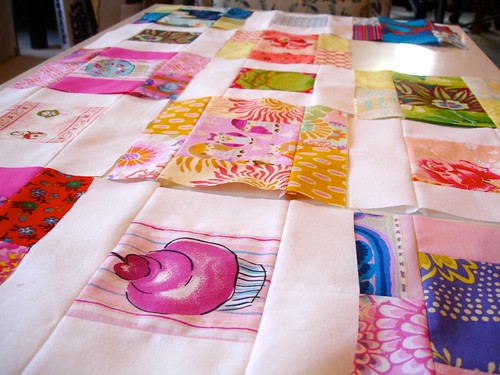
Scrap Quilt Blocks - First 14 Blocks
Scrap Quilt Blocks - First 14 blocks
While cleaning up my studio (which is an ongoing project) I realized I have so very much fabric. A lot of it I was saving for indeterminate reasons. Scrap fabric that Michelle gave me, extra fabric from curtains, old pajamas - I really needed a project to start helping me get rid of all this.

Obviously I should do a scrap quilt! I needed something that would be able to combine a lot of different colors so I could use lots of stuff up. And I wanted to do something that uses 4 inch squares, since I had a few charm packs of those sitting around from forever ago.

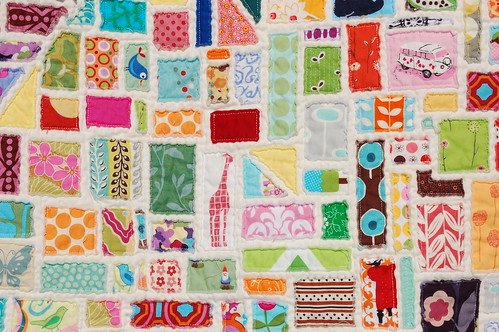
So, I got started on washing and cutting the saved fabric into 4 inch squares and looking for a pattern. And I found tons of great patterns, like ticker tape quilts:
close up of owl
but they use different sized squares, and holy crap the actual quilting part is intimidating.

So, I kept cutting my squares while watching tv and researching. I couldn't do anything with strips either, since I'd already pre-cut 4 inch squares (note to self: In the future, determine type of quilt you're going to make before just cutting the pieces, whoops). I finally found this quilt on etsy that gave me an idea for the pattern:

That's Quiltville's "A Trip to Central Park Toddler Quilt". There were squares! Even if there was cutting involved! And, you could use lots of different weird patterns! Hooray!

So I got busy, and so far I've made 15 squares of the quilt. I imagine it will take something like 40 to make a lap quilt or so? I'm not entirely sure, but I'm enjoying it.

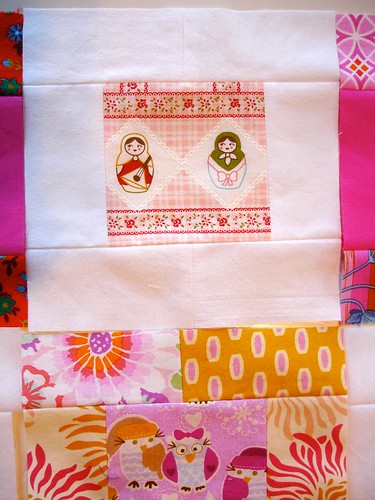
Here's my favorite square so far:
Scrap Quilt Blocks - Matroyshka Block

Check the pictures on flickr for tons of notes about where the fabrics come from.

Friday, March 18, 2011

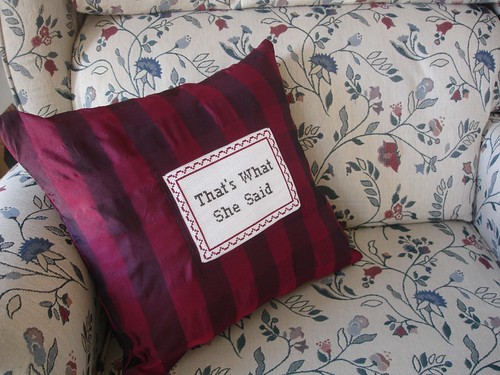
That's What She Said pillow

That's What She Said Pillow in situ
A gift for Amy (who loves saying this all the time!) as part of our Secret Santa/February gift exchange. Only a little late!

I cross-stitched the design based on one I found online, and sewed together the pillow using this tutorial: Load of Craft Zippered Throw Pillow tutorial.
Using up my zippers is sort of fun! Though I keep getting distracted by quilts. I have this theory that quilting is going to be the new knitting. Of course, I'm kind of making that up. But it could be!

Spoonflower Squid Contest Live!

Awesome! The Spoonflower Squid Fabric design contest is running now, so go over to the contest page and check out all 164!

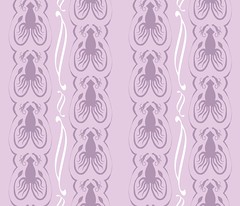
Feel free to vote for mine ;) "Tentacles in Lavender" by leah_riley.
Spoonflower Fabric Contest Squid Design - Tentacles in Lavender

Tuesday, March 15, 2011

Spoonflower Contest: Squids!

I have been meaning to design and enter the Spoonflower fabric design contests for years now. When I saw that they were doing squids, I just *had* to (and of course forgot until the last minute and had to stay up late finishing it for the deadline last night, for which I blame Daylight Savings time).

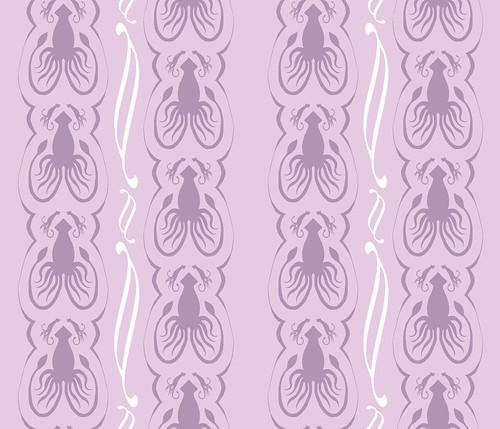
Here's my squid design titled "Tentacles in Lavender":
Spoonflower Fabric Contest Squid Design

If I had more time, I might have done something more sketchy or something. As it is, I did the initial design drawing in my sketchbook, and since I don't have my scanner set up, I took a picture of it to get it into Photoshop and agonize over it for hours.

Making it a repeating design in all directions kept making my brain hurt. Nick watched me as I gnashed my teeth, grabbed my hair and kept saying "It's just math! But both ways!!"
In the end, I did it! Yay! Maybe next time I will have the forethought to work ahead more than a few hours.
The next contest is maps, and I really want a map of Narnia on cloth... hmm..

Oh! And they haven't started letting us vote yet! But I'll be sure to let you know if I make the cut and you can vote on my fabric. The winner gets a $100 gift card to Spoonflower, which means I can add to my insane collection of fabric! I need to feed my addiction!