Showing posts with label tutorial. Show all posts

Friday, June 24, 2011

Friday Finds / Tutorial! Crocheted Necklace Video

This week has been sort of an off week for me, in case you couldn't tell from the lack of random craftsplosion that you usually get on here.

One thing I've found and I think is very satisfying is crocheting with beads - but not actually crocheting, just repeating one tiny slip stitch over and over.

Here's a fantastic video tutorial I've been using as a reference: it's for creating a multi-strand crocheted bead necklace.

It was based on the fact that I've been cleaning out my beads and jewelry supplies - I've found lots of beads that I like, but really don't know what to do with. I was looking on etsy for ideas and I found this:

Crystal garden series crocheted bracelet by SidneyAnne

I love it! Nick says it looks like a magpies nest, but in a good way, which is exactly what I like about it! Anyway, I've been working on just doing black thread with black beads for now to get a feel for it. It's super fun, and kind of relaxing. I think I have a new craft to bring to Craft Night!

Also - I was watching an episode of Robin Hood where Richard Armitage kept taking his shirt off *for no reason* (well, except ratings, I suppose) and I accidentally made a strand 6" longer than the others because I was so distracted. I feel silly.

Thursday, March 24, 2011

Altered Four Square Quilt Block Tutorial, or How I Am Going to Learn to Make Tutorials

Altered Four Square Quilt Blocks - Laid Out
Maybe the internet doesn't need another quilting tutorial, and maybe, if I knew what the heck this actual quilt block was called, I'd just link you to someone else's. But! Since I feel like making tutorials is something every good crafty blog does, and I need practice doing them, you get at tutorial. Hooray! Right?

And, it's going to be incredibly long! Because it's picture time, picture time! I'm a visual person, and I love tutorials with 1,000,000 pictures so I know when they say "flip the second piece over and sew it" that I'm flipping the correct piece over, and then sewing it EXACTLY LIKE THEY ARE. I don't want to get to step 8 and be all "Oh crap, UR DOING IT WRONG" all over everything and cry and cry.

I don't actually cry. I just give up. Or, really, what I do, is look at the entire tutorial and if it doesn't make sense with the pictures and text, then I don't do it. Which has a lot to do with my whole perfectionism thing, and my worry that I'm just going to make a mess, which I'm getting over, thank you. I am all cool with making messes.

Enough about me, let's talk some more about sewing quilt blocks. That's what we're here for.

Materials:
- Rotary Cutter
- Clear Quilter's Ruler
- Cutting Mat
- 4 Fabric Squares of the same size (I'm using 4 inch x 4 inch squares here)
- Sewing Machine & Electricity
- Thread
- Iron
- Pins!

Step 0 (not shown): Prepwork
Wash your fabric. Iron it and cut it into 4 inch squares. I like to do the cutting just whenever - watching TV or while waiting for my tea to steep - with my 4 inch square Omnigrid cutting guide made of plexiglas and my rotary cutter. In case that's helpful. Also, set up your sewing machine - thread it and all that stuff.

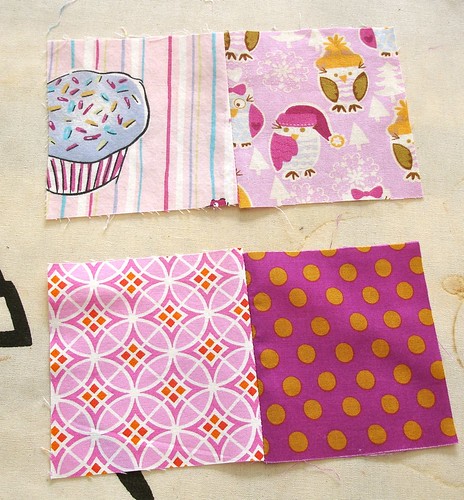
Step 1: Layout Four Squares the Way You Like
We're sort of making a picture frame (as you see in the picture above) so the top two squares I will call the Framing Pair, and the middle two squares I will call the Middle Pair. The top Framing Pair is centered in the design. The bottom "middle square" is centered with it's companion to the right. I actually decided to make the diamond design the "Middle Square" - so sorry for the confusion. I forgot to take a picture! Or I screwed up! Whichever! Just remember - AFTER this picture, diamonds are middle square and polka dots are companion square.
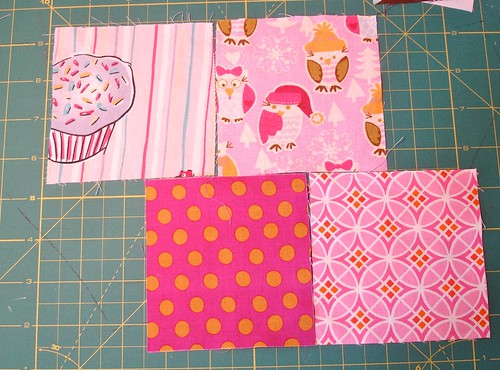
Altered Four Square Quilt Block Tutorial: Positioning of Both Pairs

Step 2: Flip and Pin Both Pairs
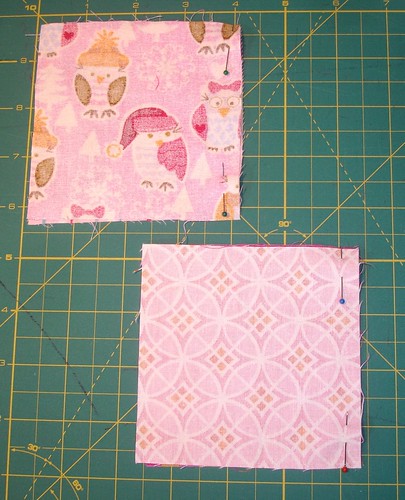
Flip the right square of both pairs over onto the left square so that the right sides of the fabric are facing each other. Then pin on the right side (for optimum sewing machine feeding) of both.
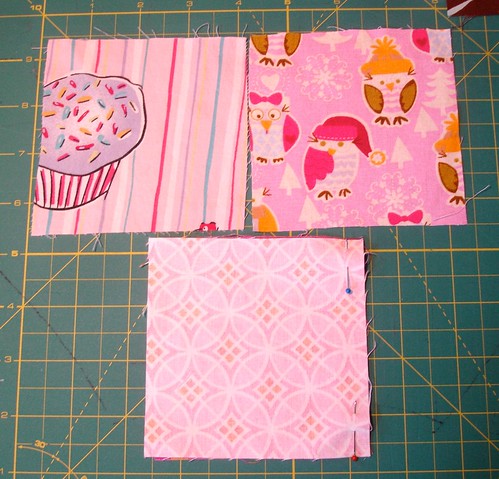
Altered Four Square Quilt Block Tutorial: Initial Pinning of Both Pairs

Step 3: Sew Pairs (No backstitching)
Sew each of the pairs using a straight stitch 1/4" from the right edge and don't backstitch at the beginning and end. I know, it's weird. Just sew straight through both of them. In fact, I like to feed them in one after the other (waiting a bit while running the machine between so they don't overlap). It makes a sort of cute garland! Cut them apart and trim the threads.
Note: This top picture actually has four pairs in it instead of two - I'm working on two blocks at once - the other pairs are for a white block. Don't get too confused by this, just pay attention to the pink ones!
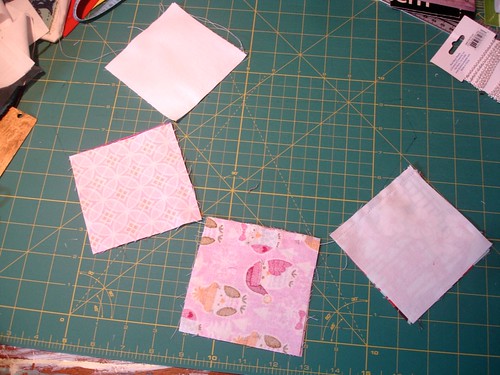
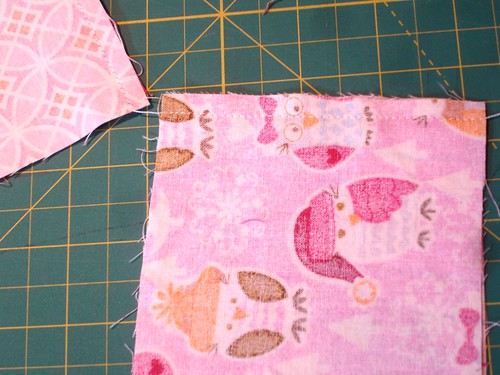
Altered Four Square Quilt Block Tutorial: Initial Sewing of Both Pairs
Altered Four Square Quilt Block Tutorial: Sewing Both Pairs

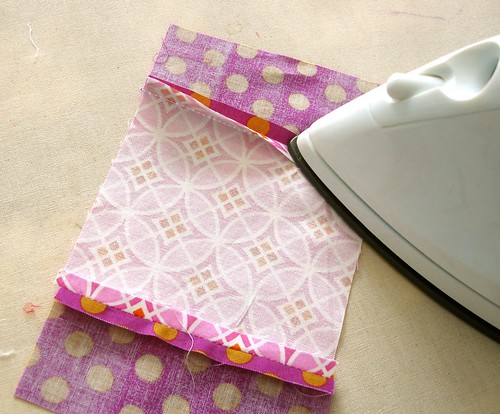
Step 4: Pressing
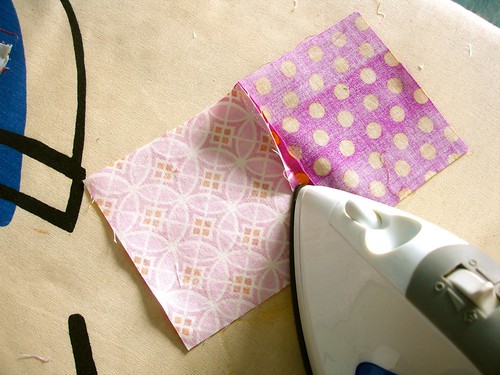
Set the sewn pairs on your ironing board, opening them up with the right sides down. Gently flatten down the seam allowances and press them open with your iron. Don't run the iron back and forth, move the iron by gently pressing it up and down on the fabrics. I like to think of it as gently *stomping* the fabric with the iron. Like a baby elephant. This is part of the "not having backstitched" thing, as moving the iron around may loosen your stitches and also stretch your fabric out weird. I am guilty of doing this all the time, though, so don't stress it too much, just try.
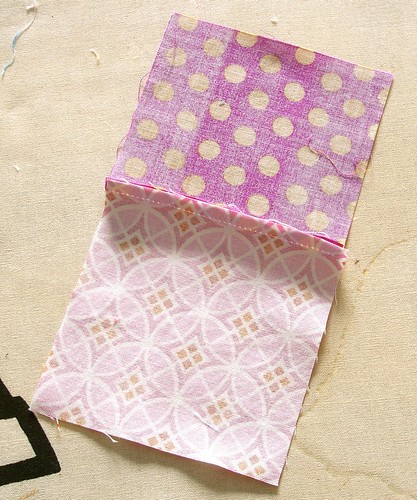
Altered Four Square Quilt Block Tutorial: Pressing Both Pairs

Flip the pairs over and press the front as well. Ahh, those look nice.

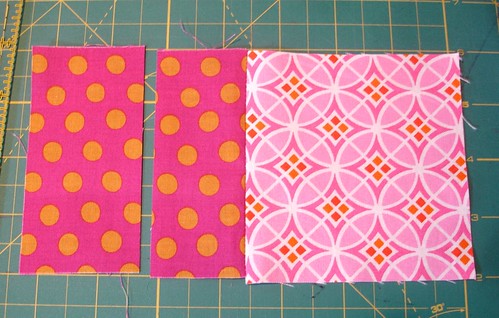
Step 5: Cutting the Middle Pair
Remember which square was your "middle square" in your Middle Pair? Good! Obviously I don't, because I am now using the diamond as the "middle square" and the polka dots as the companion. Oh well, we shall sally onward.

Now, take and cut the companion or non-middle square in half vertically. I use the clear plastic ruler here to measure two (2) inches from its edge (it's not going to look perfectly centered anymore, because you've sewn the other side) and cut with my rotary cutter so I end up with at 2"x4" piece.
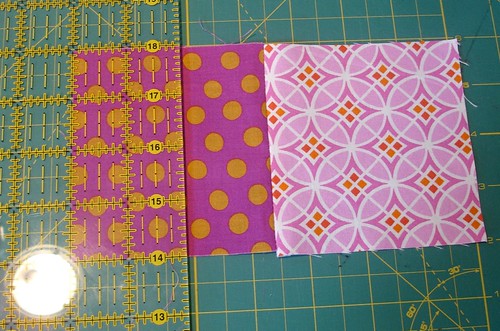
Altered Four Square Quilt Block Tutorial: Cutting the Middle Pair

Step 6: Flip and Pin the Middle Pair
Flip the 2" x 4" piece you just cut so that the right sides are facing each other (and the wrong sides are facing out) and line it up on the other side of the Middle Square. Pin along the right side.
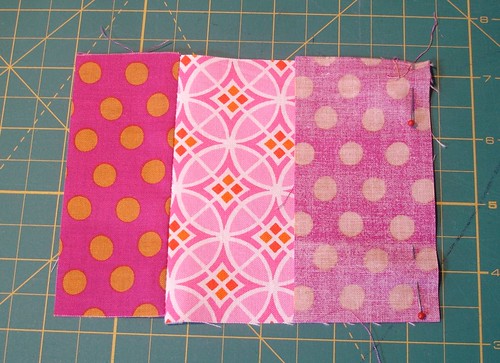
Altered Four Square Quilt Block Tutorial: Pinning the Middle Pair

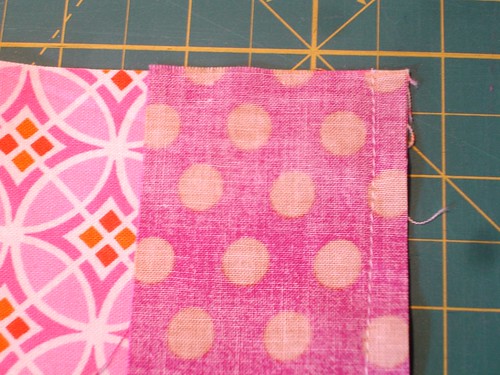
Step 7: Sew the Middle Pair
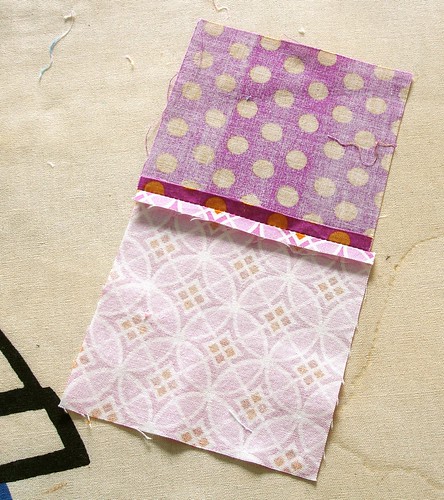
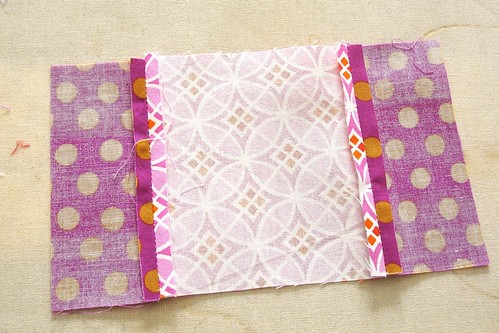
Sew together using a straight stitch 1/4" from the right edge and don't backstitch at the beginning and end.
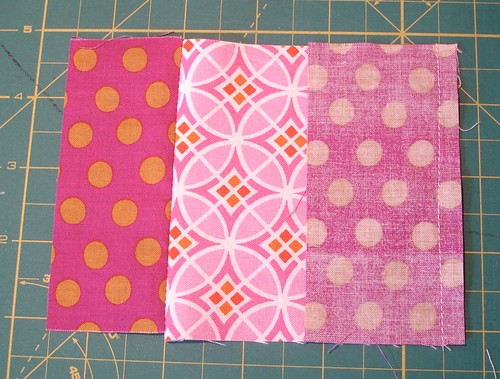
Altered Four Square Quilt Block Tutorial: Sewing the Middle Pair
Altered Four Square Quilt Block Tutorial: Sewing the Middle Pair - Closeup

Step 8: Press the Middle Pair
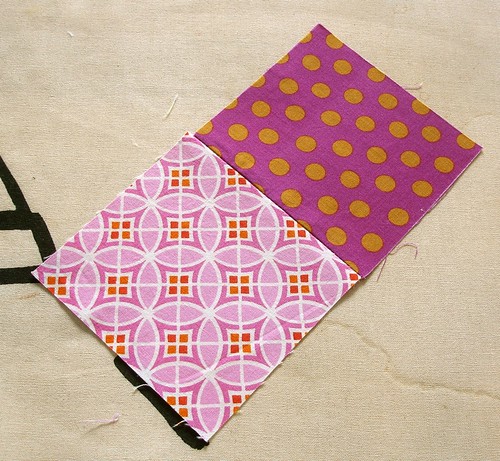
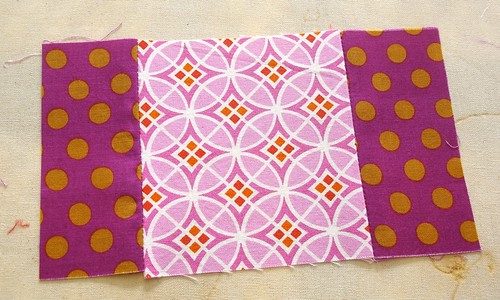
Flip the fabric over and open so the right sides are all down, then gently press open the seams. Press the front as well.
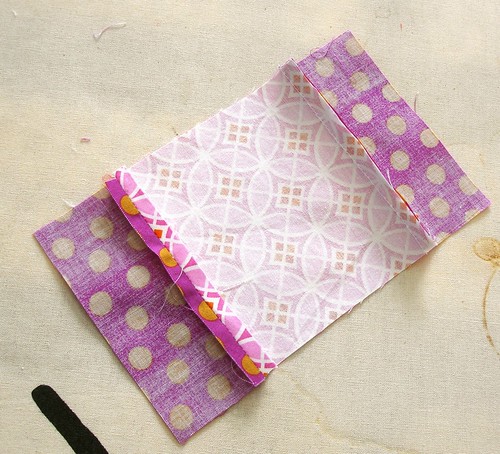
Altered Four Square Quilt Block Tutorial: Pressing the Sewn Middle Pair

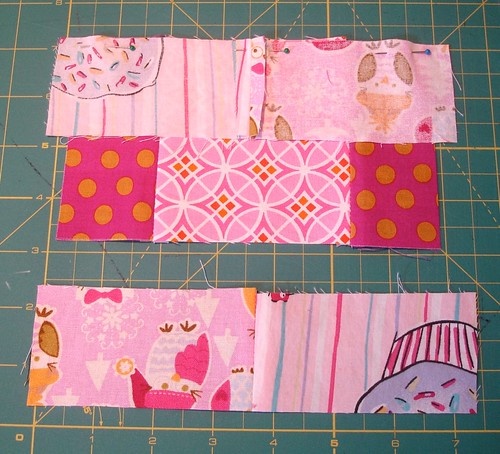
Step 9: Cutting the Framing Pair
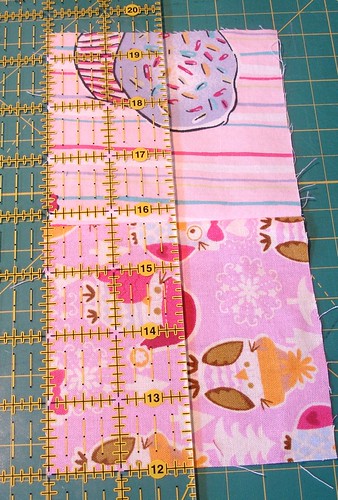
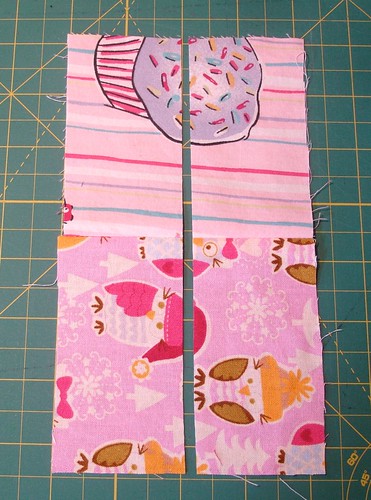
Lay the Framing Pair above the now-completely-sewn Middle Pair and refresh your memory about how you want the block to go. Layout your Framing Pair so that it's vertical and cut it in half vertically 2" from both sides using the clear ruler. That didn't make the best sense, but essentially, you want to cut it into two long strips of 2" x 7.75" (or so).
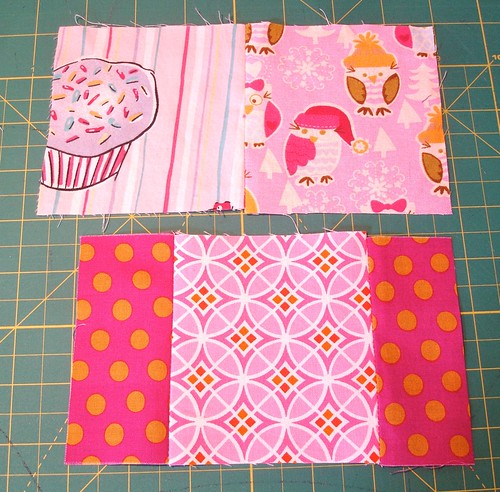
Altered Four Square Quilt Block Tutorial: Positioning the Framing Pair around the Sewn Middle pair
Altered Four Square Quilt Block Tutorial: Cutting the Framing Pair

Step 10: Position and Pin Top of Framing Pair
Layout the cut Framing Pair around the now-completely-sewn Middle Pair. Try and center the Framing Pair seams. I like to alternate the sides of the patterns, so the Framing cupcake is on the left at the top, and on the right at the bottom, but you're welcome to do this however you like.
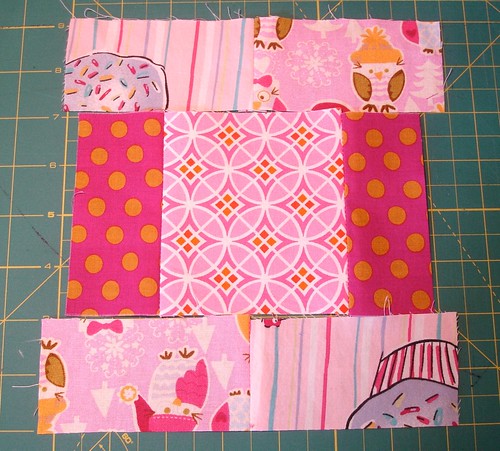
Altered Four Square Quilt Block Tutorial: Positioning the Framing Pair around the Sewn Middle pair
Altered Four Square Quilt Block Tutorial: Pinning the Top of the Framing Pair

Step 11: Sew Top of Framing Pair
Sew 1/4" from edge using a straight stitch. Do not backstitch.
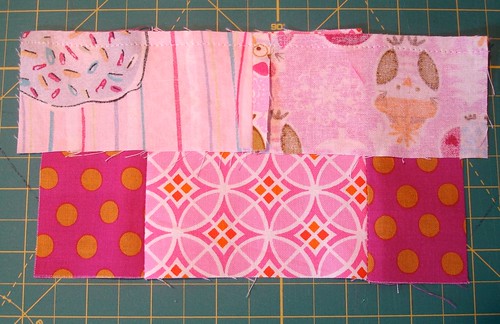
Altered Four Square Quilt Block Tutorial: Sewing the Top of the Framing Pair to the Block

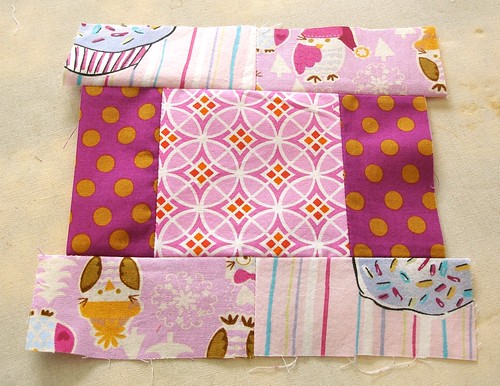
Step 12: Position and Pin Bottom of Framing Pair
For once after sewing you don't immediately go and press! Nope! This time, bring the just sewn and still folded piece back over and line up the bottom of the framing pair so that the the right sides of the bottom framing pair are laid down on the right sides of the middle pair, and match up the seams from the top of the framing pair (part you've just sewn) and the bottom of the framing pair.
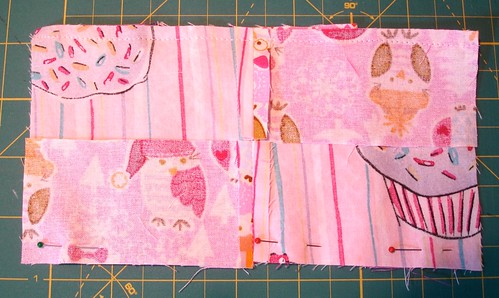
Altered Four Square Quilt Block Tutorial: Pinning the Bottom of the Framing Pair

Step 13: Sew Bottom of Framing Pair
Sew 1/4" from edge using a straight stitch, and (say it with me) do not backstitch.
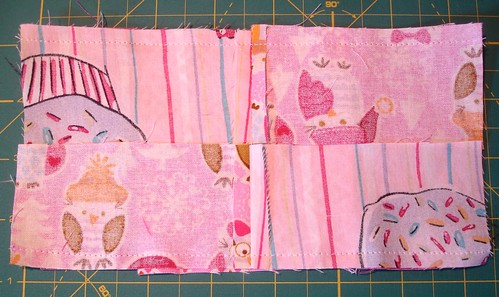
Altered Four Square Quilt Block Tutorial: Sewing the Framing Pair

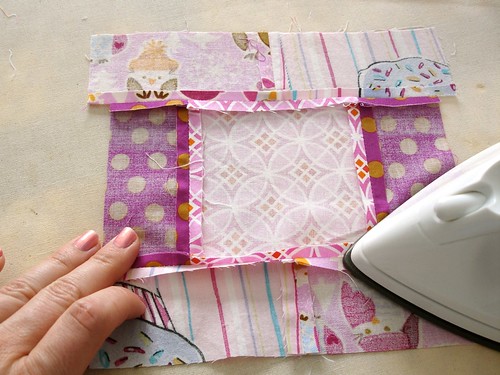
Step 14: Press it One More Time!
Unfold and lay the block flat on the ironing board with all the right sides facing down. Gently press the seams open with the iron, pressing it up and down on the seams, not moving it all around. Then flip over and press from the front.
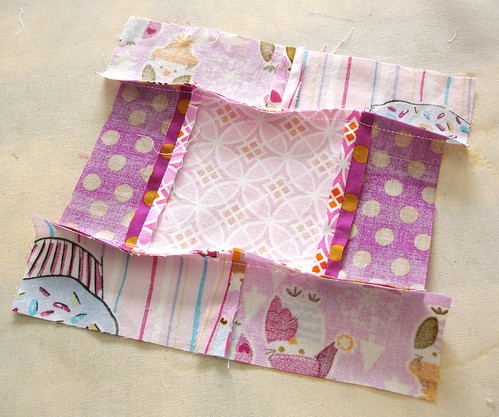
Altered Four Square Quilt Block Tutorial: Pressing the Block's Seams
Altered Four Square Quilt Block Tutorial: Pressing the Block

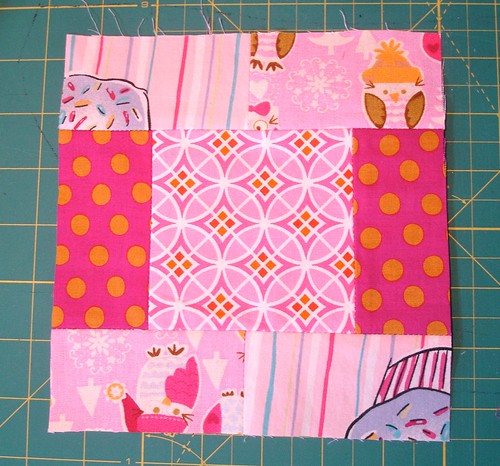
Step 15: Square Up/Trim Edges
Take the quilt block back to your cutting mat and trim it into a square shape using your clear plastic ruler and rotary cutter.
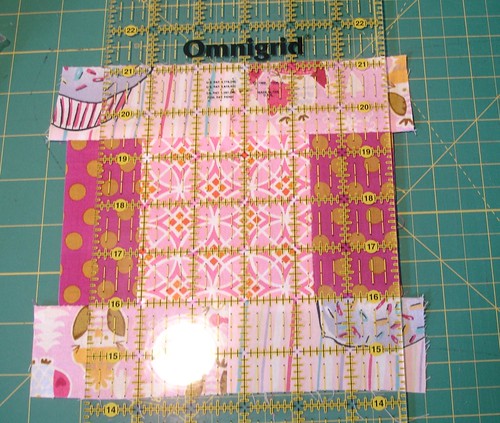
Altered Four Square Quilt Block Tutorial: Trimming the Block / Squaring Up

You Now Have a Square!
Altered Four Square Quilt Block Tutorial: Finished Bloc
Since I'm using four inch squares to begin with, the end block is a bit of an odd size - it's like 7.75" x 7.75" so I'm not entirely sure what size I'm going to do the final "squaring up" to. I'll be sure to post it when I'm through.

Tips!
- Be sure when cutting your fabric squares to cut with the fabric threads squaring up as well. Otherwise, cutting them when they're going diagonally, or on the bias, will make them all stretchy and weird.
- If you do maintenance and re-threading on your sewing machine, be sure to have extra fabric around to do some test runs on before using your "actual" fabric. That way you don't screw up one of your pieces.
- I like to to work on two squares at a time, one with an all white frame and a patterned one. See
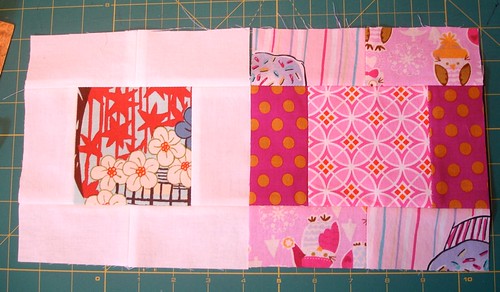
Altered Four Square Quilt Block Tutorial: Finished Blocks
I don't get confused, and it's easy to to double-up some of the work. Other people can probably do more.

I hope that helped somebody out there. It's a pretty easy block that doesn't require much of you, alternating the blocks with white framed blocks looks really pretty to me.

Friday, August 27, 2010

Hello! Throw Pillow!

HELLO WORLD!
I am returning to the internet for real this time! Okay, and by that, I mean that I'm going to update this blog nearly thrice weekly once again! There's been some personal drama over the last year or so, and now I'm just making things for fun and doing things that I want and seeing how it turns out.

I like trying lots of new things, and I can't wait to sew more stuff, and work on some apparel and jewelry. If I think it's fun or cool, I'm probably going to try it. Ooo, also, using cut paper - I have so much paper and material, it's sickening!

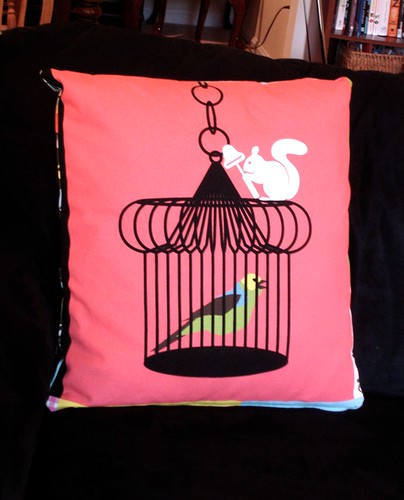
First up, I've been meaning to make this pillow every since I bought this fabric* at IKEA last year!

Zippered Throw PIllow Cover


What says "classy" better than a squirrel holding a cheese slicer?
A squirrel holding a cheese slicer standing on a birdcage! That's what!

I know, you are jealous, but seriously, it was pretty easy to make. I followed this tutorial and everything came out pretty well.
Zippered Throw Pillow Tutorial at Design*Sponge.

Here's the problems I ran into while sewing:
- Rat nests: My machine needs cleaning, so there was some ratnests on the back (you can't see them, so yay!)
- Thread Tension: It was hard for me to figure out the correct tension for this fabric, because it's thick, almost canvas-like fabric. Eventually I think I got it, but it took awhile. Hopefully it won't fall apart.

Well, it's good to be back to crafting! Hopefully I'll be doing new and interesting, or at least interesting things in the near future!
* This is the Lotta Kuhlhorn 2008 IKEA fabric

Tuesday, September 1, 2009

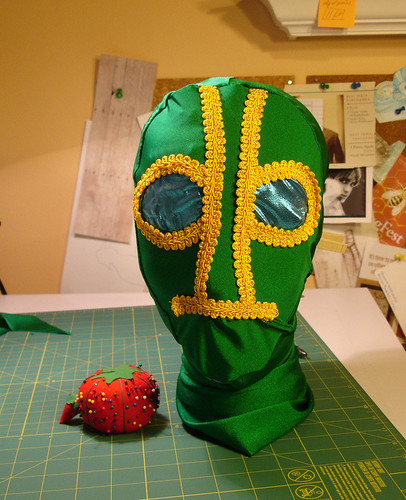
Ambush Bug Mask - Costuming & Sewing - Finished!

Ambush Bug Mask: Finished!

Here the mask is modeled on the glass head that I have. To see more pictures of the process, click on the image!

I think it turned out pretty good considering I'd never:
- sewn spandex
- sewn thick trim
- made a mask

The mouth still needs to be cut open, but I wasn't sure how far to cut it, so I'll wait till Stuart tries it out.

I used this online tutorial about making a spandex mask with a collar. It's a little confusing, but it totally works out! Also, FREE!

Other key elements (from Jared Axelrod):
- 1" seam allowance
- zig-zag plus straight stitch

Hooray! Now back to work on my Omega Pin, as well as drawing some lumberjacks (for a soon-to-be-announced project).

Friday, August 28, 2009

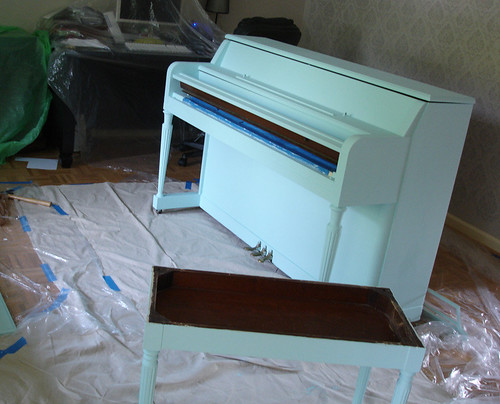
Painting the Piano: In the Midst of Madness

Painting the Piano: Blued!
The Piano is Now Blued

In case you get the urge to paint some piece of furniture yourself, here's my advice - follow this How to Paint Furniture tutorial from Young House Love (yes, I'm not crazy about the name of the blog either, formerly "This Young House").

One major edit:
Step 0: Test Existing Paint Job for Lead
Really easy, they sell these Q-tip-like Lead Tester swabs at any place like Lowe's, and you get two or three of them for $5. This way you can avoid creating a lot of lead dust, which would suck.

I anticipate painting on the monster face tomorrow (Saturday!) so if you haven't voted, get to it! The poll closes at midnight tonight!

Thursday, July 9, 2009

Wonderland Week: Wintergreen Transfer Tutorial

This is a printmaking technique I learned in college - it's very useful for transferring photocopied images onto nice paper, or stones. I wanted to test its use on fabric. It totally works! Here's a quick tutorial for everyone out there itching to transfer designs.

Materials:
- Photocopied versions of your designs (note: it will be reversed!)
- Wintergreen Oil (mine is synthetic)
- Paper towels
- Tape
- Fabric / paper you want to transfer onto
- Iron*
- Tissue Paper*
* May not be necessary

Note: You will be using a concentrated oil, so you might want to wear gloves. You definitely do NOT want to get it in your eyes. It's also good to do this in a ventilated area, or at least one with an open window!

Step 1: Cut out your photocopied designs and place them copied sides up on fabric to figure out where they go. I had to measure mine from the edges and everything. I designed these spades for my Alice apron - they're pretty much symmetrical so I don't have to worry about the reversal.

Wintergreen Transfer Tutorial: Layout

Step 2: Flip over your photocopied designs (re-measure to make sure they're in place) and tape them with the photocopied side down.

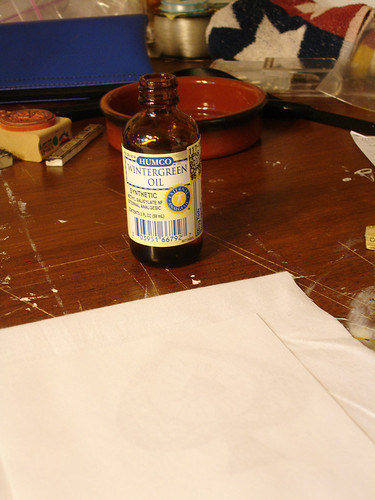
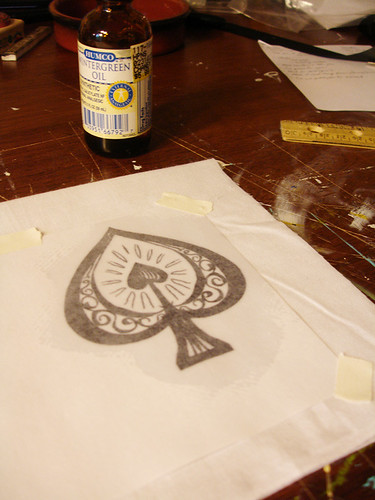
Wintergreen Transfer Tutorial: Wintergreen Oil

Step 3: Open up the wintergreen oil (trust me, if your nose is in any way sensitive, you want to wait until now) - fold up a paper towel, put it over the open end of the oil, and tip it 2-3 times. It doesn't take much oil, and it is smelly.

Step 4: Blot the paper towel full of wintergreen oil on the face down photocopy until the entirety of your design is wet (it will become pretty much see-through, so it's easy to tell if you miss any spots). You probably want to close up the wintergreen bottle at this point, too.

Wintergreen Transfer Tutorial: Dab!

Wintergreen Transfer Tutorial: Wet Paper

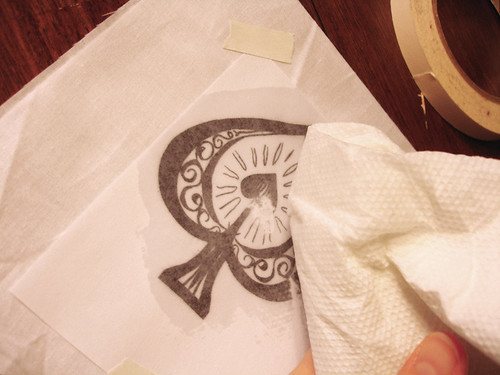
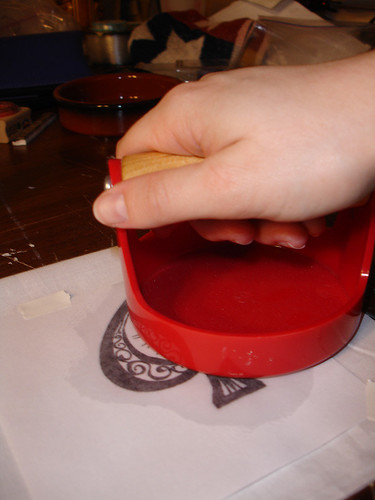
Step 5: Rub/press the paper towel over the design, being careful not to move the design (good thing it's taped down!). If you own a baren, you can use that. You don't have to do too much - the more you rub/press the more the image transfers, but after a certain point the ink starts to bleed/feather a little, and your image may be a little blurry.

Wintergreen Transfer Tutorial: Baren Press

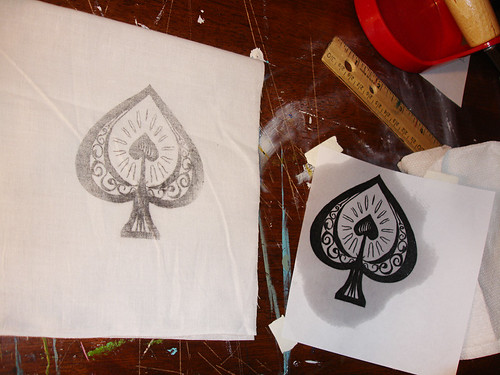
Step 6: Remove the tape and peel back the paper -Tada!

Wintergreen Transfer Tutorial: Ta-da!

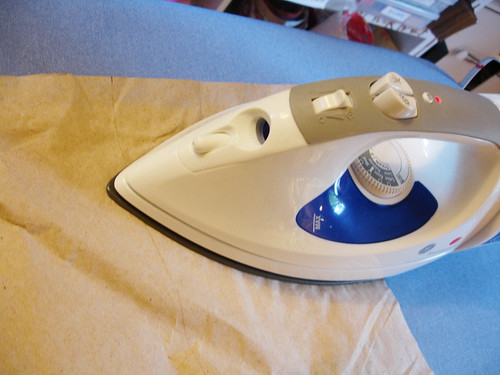
Step 7: Let the design dry and iron (I was impatient to make this tutorial, so I didn't let mine dry, but it's probably a good idea). Put some tissue paper over the design and iron it. The tissue paper will keep the ink from transferring onto your iron (it will transfer onto the tissue paper, however slightly). I don't know if the ironing is necessary but it seemed like a good idea.

Wintergreen Transfer Tutorial: Ironing

Step 8: Wash. I washed mine with Woolite, cold/cold, on the handwash/casual setting. It came out fine!
I also washed it by itself, so it wouldn't transfer onto anything else, but that may not be a problem. I didn't have time to check before this. I also let mine air dry, because I worried the heat in the dryer might make re-transfer.

Now, it depends on what you're doing with this whether you want to wash it or not. Keep in mind that the fabric will overwhelming smell like mint for a week or longer if you don't wash it. Also, if it will be touching human skin for a prolonged period of time (especially around the eyes!) then it's a good idea to wash it.

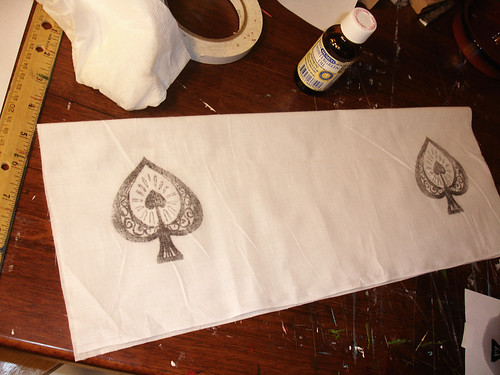
Wintergreen Transfer Tutorial: Both Transferred!

And now you're done! There you go! Practically photocopying designs onto fabric! Next time I'm going to make Will a cool button-up shirt.